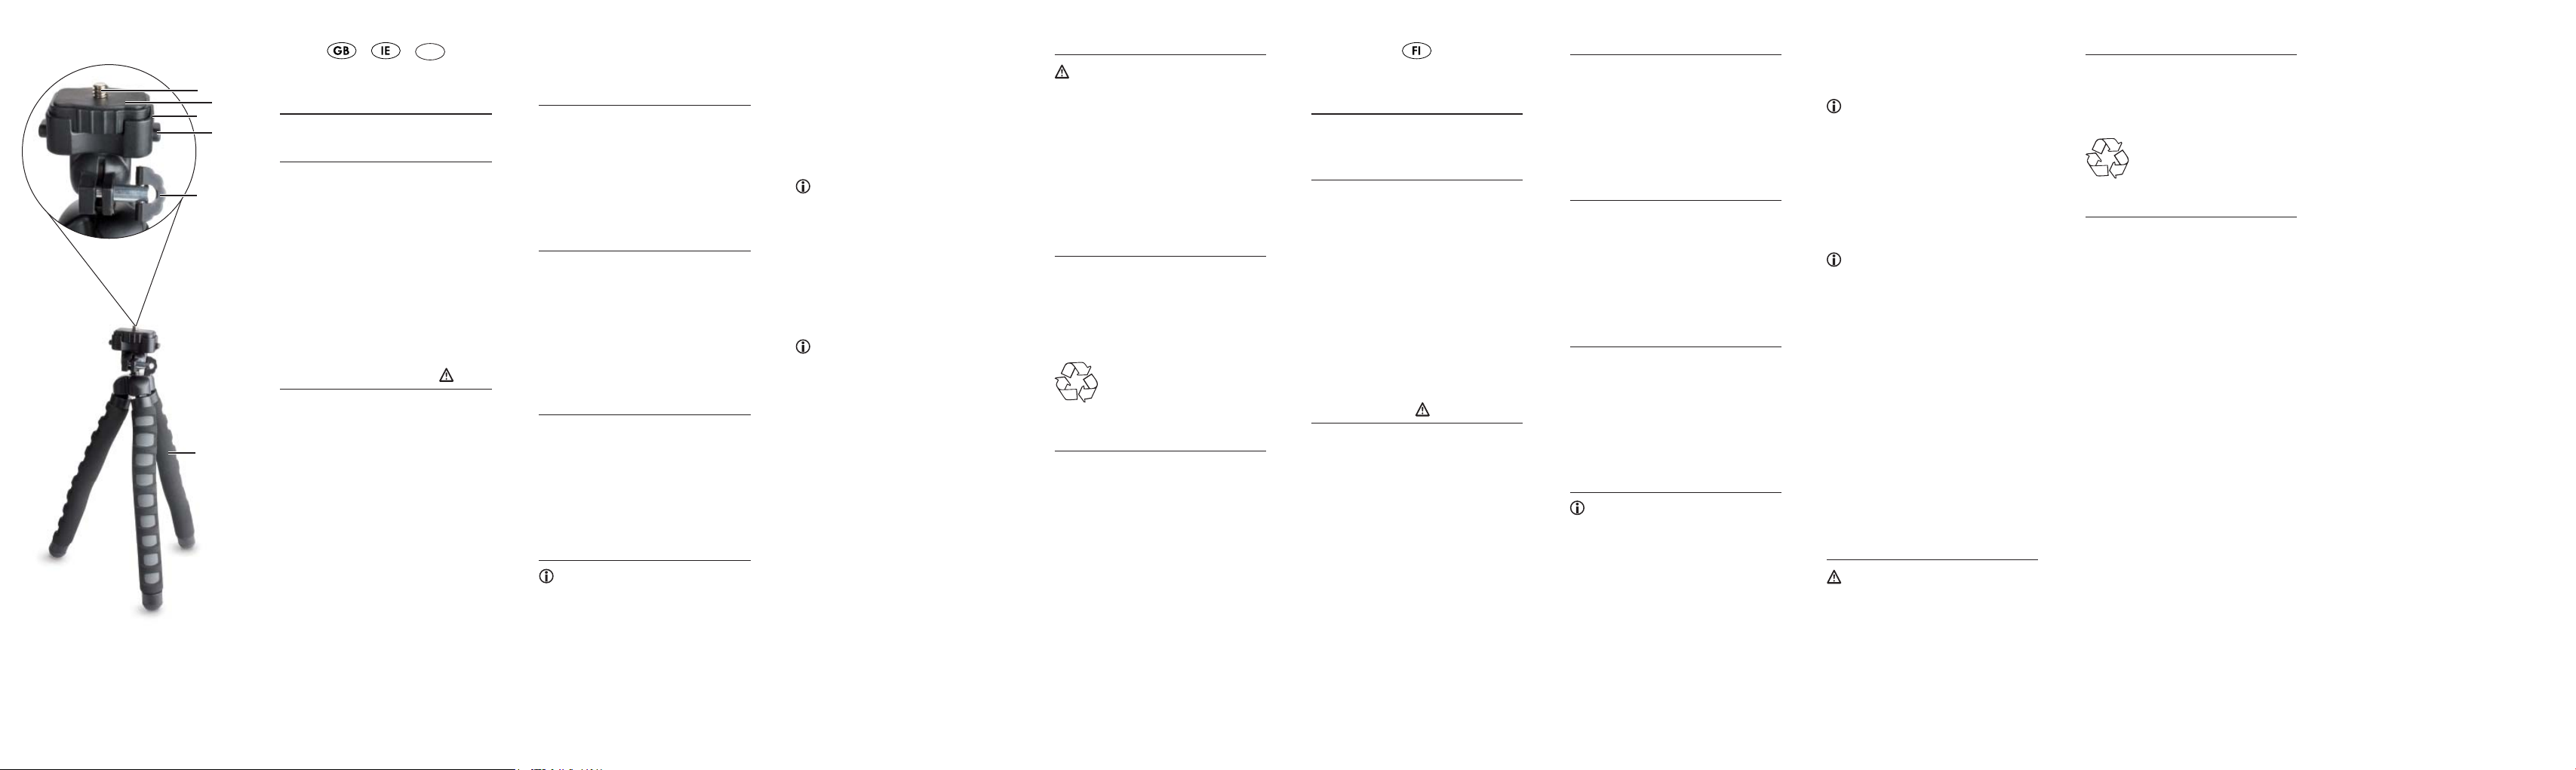
- 1 - - 10 -- 9 -- 8 -- 7 -- 6 -- 5 -- 4 -- 3 -- 2 -
ID-Nr.: SSTS1500A1-10/10-V2
IAN: 61188
/ /
CY
CAMERA TRIPOD
SSTS 1500 A1
Intended use
This tripod is designed for attaching
video and photo cameras or other
devices with a matching thread.
This tripod is intended only for private use
and not for commercial applications.
Any use other than as described here is
not permitted and could lead to dam-
ages and injuries. No liability will be
assumed for damages resulting from mis-
use or improper handling, use of force or
any unauthorized modifi cation.
Safety Instructions
Read these operating instructions •
carefully before using the appliance for
the fi rst time and preserve this booklet
for later reference. Pass this booklet
on to whoever might acquire the ap-
pliance at a future date.
Ensure that the device is fi rmly •
screwed onto the quick release
plate. Otherwise, it may fall off and
become damaged!
Ensure that the quick release plate is •
fi rmly attached to the tripod plate. If
you do not, the device may fall off
and become damaged.
Never burden the tripod with more •
weight than that indicated in the tech-
nical data. If you do, the device and
the tripod may be damaged.
Provide for suffi cient stability for the •
tripod.
Items supplied
Before using the appliance for the fi rst
time, check to ensure that the appliance is
complete and free of visible damage.
Camera Tripod
Operating instructions
Technical Data
max. loading: 1500 g
(with tripod legs extended)
Length: 27 cm
(with tripod legs planted/extended)
Thread: 1/4 inch
Weight : 155 g
Description of
the appliance
1 Thread 1/4˝
2 Quick release plate
3 Tripod plate
4 Locking pins
5 Securing screw (for tripod plate 3)
6 Flexible tripod legs
Using the tripod
Note:
Do not attach devices heavier than
1500 g to the tripod. The tripod cannot
hold the load. The affi xed devices as
well as the tripod could be damaged.
• Screw the device onto the quick
release plate 2 so that it is fi rmly
seated.
• Spread the tripod legs 6 equally
so far apart that the tripod has a fi rm
standing. The further the legs 6 are
spread apart, the more secure the
tripod is.
• Adjust the tripod plate 3, with the de-
vice, into the required position. Fix this
position using the securing screw 5.
Note:
You can adapt the tripod legs 6 to
uneven ground by bending them. It is
also possible to position the tripod using
the fl exible tripod legs 6 for example,
on railings or similar. However, always
ensure that the tripod with the mounted
device is standing safely and securely.
Note:
This tripod is equipped with a quick
release plate 2. When a device is
screwed onto the quick release
plate 2 you can, by pressing the four
locking pins 4 on the sides of the tripod
plate 3, release the device together
with the quick release plate 2 from the
tripod plate 3. Thus, you do not always
have to unscrew the device from the
thread 1.
To replace the quick release plate 2
complete with the device back on the
tripod plate 3, press the locking pins
4 and reposition the quick release
plate 2. Then release the locking pins
4, so that the quick release plate 2 is
fi rmly seated.
Toimitettavat osat
Tarkasta toimituksen täydellisyys ennen
käyttöön ottoa ja toimitetut osat mahdollis-
ten näkyvien vaurioiden varalta.
Kamerajalusta
Käyttöohje
Tekniset tiedot
Suurin sallittu kuormitus: 1500 g
(statiivijalat ulosvedettynä)
Pituus: 27 cm
(statiivijalat asetettuna/ulosvedettynä)
Kierre: 1/4 tuumaa
Paino: 155 g
Laitteen kuvaus
1 Kierre 1/4˝
2 Pikaliitäntälevy
3 Statiivilautanen
4 Lukitukset
5 Kiristysruuvi (statiivilautaselle 3)
6 Joustavat statiivijalat
Statiivin käyttö
Ohje:
Älä koskaan kiinnitä statiiviin yli 1500
g painavia laitteita. Statiivi ei kestä
kuormitusta. Kiinnitetyt laitteet ja statiivit
voivat vaurioitua.
• Ruuvaa laite statiivilautaselle 2 niin,
että se on tiukasti paikoillaan.
• Levitä statiivijalkoja 6 tasaisesti
erilleen niin, että statiivi seisoo va-
kaasti paikoillaan. Mitä leveämmälle sta-
tiivin jalat 6 levitetään, sitä vakaam-
min statiivi seisoo.
• Aseta statiivilautanen 3 laitteineen
oikeaan asentoon. Lukitse tämä asento
kiristysruuvin 5 avulla.
Ohje:
Voit sovittaa statiivijalat 6 epätasaisille
alustoille taivuttamalla niitä. Lisäksi
statiivi voidaan kiinnittää joustavien
statiivijalkojen 6 avulla esimerkiksi kai-
teille tai vastaaviin paikkoihin. Varmista
kuitenkin aina, että statiivi ja asennettu
laite seisovat aina paikoillaan varmasti
ja tiukasti.
Ohje:
Tämä statiivi on varustettu pikaliitän-
tälevyllä 2. Kun laite on ruuvattu
pikaliitäntälevylle 2, voidaan laite
irrottaa statiivilautaselta 3 yhdessä
pikaliitäntälevyn 2 kanssa painamalla
statiivilautasen 3 sivuissa olevia lukituksia
4. Näin laitetta ei tarvitse aina ruuvata
irti kierteestä 1.
Pikaliitäntälevy 2 ja laite liitetään
jälleen statiivilautaseen 3 painamalla
lukituksia 4 ja asettamalla pikaliitän-
tälevy 2 jälleen paikoilleen. Vapauta
sitten lukitukset 4 niin, että pikaliitäntä-
levy 2 on tiukasti paikoillaan.
Puhdistus ja hoito
Ohje
Älä käytä hankaavia tai kemiallisia
puhdistusaineita. Nämä vaurioittavat
laitteen pintaa!
Puhdista statiivi kevyesti kostutetulla liinal-
la. Jos lika on kovapintaista, lisää liinaan
laimeaa astianpesuainetta.
Kuivaa statiivi hyvin.
Hävittäminen
Hävitä statiivi ympäristöystävällisesti.
Noudata voimassa olevia määräyksiä.
Ota epävarmoissa tapauksissa yhteyttä
jätelaitokseesi.
Hävitä kaikki pakkausmateriaa-
lit ympäristöystävällisellä tavalla.
Maahantuoja / Huolto
KOMPERNASS GMBH
BURGSTRASSE 21
44867 BOCHUM, SAKSA
www.kompernass.com
Cleaning and care
Important
Do not use abrasive or chemical clean-
ing materials. These damage the upper
surfaces of the appliance!
Clean the tripod with a lightly moistened
cloth. For stubborn soiling use a mild
detergent on the cloth.
Dry the tripod well.
Disposal
Dispose of the tripod in an environ-
mentally-friendly manner. Observe the
currently applicable regulations.
In case of doubt, please contact your
waste disposal centre.
Dispose of all packaging
materials in an environmentally
friendly manner.
Importer / Service
KOMPERNASS GMBH
BURGSTRASSE 21
44867 BOCHUM, GERMANY
www.kompernass.com
KAMERAJALUSTA
SSTS 1500 A1
Määräystenmukainen
käyttö
Statiivi on tarkoitettu videokameroiden
ja valokuvakameroiden tai muiden so-
pivalla kierteellä varustettujen laitteiden
kiinnittämiseen.
Tämä statiivi on tarkoitettu ainoastaan yk-
sityiskäyttöön, ei kaupallisiin tarkoituksiin.
Muu kuin tässä kuvattu käyttö ei ole sallit-
tua ja voi johtaa vaurioihin ja loukkaan-
tumisiin. Valmistaja ei vastaa vahingoista,
jotka aiheutuvat virheellisestä tai asiatto-
masta käsittelystä, väkivallan käytöstä tai
omatoimisista muutoksista.
Turvaohjeet
Lue käyttöohje huolella ennen •
ensimmäistä käyttöä ja säilytä se
myöhempää käyttöä varten. Jos myyt
laitteen, anna ohje myös seuraavalle
omistajalle.
Varmista, että laite on ruuvattu tiukasti •
pikaliitäntälevyyn. Muuten se voi
pudota ja vaurioitua!
Varmista, että pikaliitäntälevy on lii-•
tetty tiukasti statiivilautaseen. Muuten
laite voi pudota ja vaurioitua.
Älä kuormita statiivia teknisissä tie-•
doissa ilmoitettua painoa suuremmal-
la kuormalla.Muuten laite ja statiivi
voivat vaurioitua.
Varmista, että statiivi seisoo riittävän •
tukevasti.
6
2
3
4
5
1
IB_61188_SSTS1500A1_LB3.indd 1-5IB_61188_SSTS1500A1_LB3.indd 1-5 21.12.2010 14:28:58 Uhr21.12.2010 14:28:58 Uhr



Deltag i samtalen om dette produkt
Her kan du dele, hvad du synes om SilverCrest IAN 61188 Stativ. Hvis du har et spørgsmål, skal du først læse brugsanvisningen omhyggeligt. Anmodning om en brugsanvisning kan ske ved at bruge vores kontaktformular.