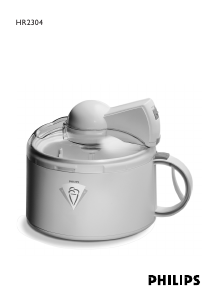
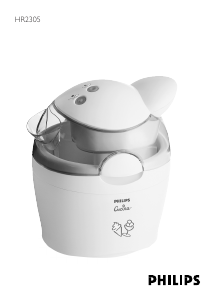
Brugsanvisning Philips HR2303 Ismaskine

Har du brug for en brugsanvisning til din Philips HR2303 Ismaskine? Nedenfor kan du se og downloade PDF-brugsanvisningen gratis på Dansk. Dette produkt har i øjeblikket 1 ofte stillede spørgsmål, 1 kommentar og har 0 stemmer. Hvis dette ikke er den brugsanvisning, du ønsker, bedes du kontakte os.

Er dit produkt defekt, uden at brugsanvisningen har en løsning på problemet? Tag til en Repair Café, og få gratis reparation.

Brugsanvisning

Loading…

5
- Move the motor unit downwards to the lid until it
locks ("Click!") (fig. 8).
- Insert the stirrer into the hole of the motor unit.
You will now hear a soft "Click" (fig. 9).
- Place the top of the Ice-Cream Maker on the
bowl. Please note the correct position.
- Turn the top in the direction of the arrow until it
locks ("Click") (fig. 10). The Ice-Cream Maker is
now ready for use.
Making Ice-Cream
Prepare the mixture of ingredients for ice-
cream.
- Do not exceed the quantities stipulated in the
recipes. The ice-cream may become less
compact if you do.
- Preferably use ingredients at fridge
temperature.
Remove the cooling container from the
deepfreezer.
- Remove the plastic bag from the cooling
container.
- Ensure that the container is free of ice. Do not
rinse the frozen cooling container: otherwise a
thick film of ice will immediately cover its
surface! A thin film of white frost may be
removed using a spatula. To avoid damage, do
not use metal cutlery.
- If properly frozen the contents of the cooling
container will have turned hard. (Does not
splash when shaken.)
Place the frozen cooling container inside the
bowl of the Ice-Cream Maker.
Assemble the Ice-Cream Maker.
Switch on the motor using on/off switch (B) ...
. . . before pouring the mixture of ingredients
into the bowl via the aperture in the lid.
The stirrer should actually be functioning when
the bowl is being filled: otherwise the
ingredients will freeze on to the cooling
container immediately.
Operate the Ice-Cream Maker (25-45 minutes).
- At first, the ice-cream may look a little gritty.
Later on it will become smooth.
Switch off as soon as the ice-cream is ready.
Remove the mains plug from the wall socket
and take the cover with the motor unit off the
appliance.
- Do not let the Ice-Cream Maker work too long:
switch off as soon as you can see ice-cream
melting at the surface or sides.
- In some cases the ice-cream will become so
solid, that the stirrer will eventually come to a
standstill. If this happens, switch the motor off:
your ice-cream is ready
With a ladle or spoon the ice-cream may be
removed from the bowl. The remainder may be
removed using a plastic spoon or spatula to
avoid damage to the cooling container.
Do not switch off until the ice-cream is ready! If
the appliance is switched off too soon the
ingredients may freeze on to the cooling
container so that the stirrer cannot rotate
anymore.
If this has happened yet:
- Switch the Ice-Cream Maker off.
- Move the slide in the direction of the arrow
and turn the top of the Ice-Cream Maker in the
direction of the arrow (fig. 2).
- Immediately turn the top in the opposite
direction until it locks ("Click") (fig. 10).
- Switch the Ice-Cream Maker on again
rightaway.
The Ice-Cream Maker is equipped with a safety
shut-off. If overloading occurs the motor is
switched off automatically.
In such a case switch off the machine. After the
motor has cooled down sufficiently you may
switch the Ice-Cream Maker on again.
Preparation time
The recipes indicate the average time required
for their preparation. However, you may deviate
from this as you see fit.
The preparation time depends on:
- the original temperature of the ice-cream
mixture;
- room temperature;
- the quantities and the composition of the
mixture.
The higher the temperature of the ingredients and
room temperature the longer it will take to prepare
the ice-cream.
The best results are obtained by cooling the ice-
cream mixture beforehand.
Ice-cream which increases greatly in volume
during preparation (e.g. the light strawberry and
Download brugsanvisningen på Dansk (PDF, 0.58 MB)
(Tag hensyn til miljøet, og udskriv kun denne brugsanvisning, hvis det er virkelig nødvendigt)

Loading…

Bedømmelse

Fortæl os, hvad du synes om Philips HR2303 Ismaskine ved at lave en produktbedømmelse. Vil du dele dine oplevelser med dette produkt eller stille et spørgsmål? Skriv en kommentar nederst på siden.
Er du tilfreds med Philips HR2303 Ismaskine?
Ja Ingen
Vær den første til at bedømme dette produkt
0 stemmer

Deltag i samtalen om dette produkt

Her kan du dele, hvad du synes om Philips HR2303 Ismaskine. Hvis du har et spørgsmål, skal du først læse brugsanvisningen omhyggeligt. Anmodning om en brugsanvisning kan ske ved at bruge vores kontaktformular.

Mere om denne brugsanvisning

Vi forstår, at det er rart at have en papirbrugsanvisning til din Philips HR2303 Ismaskine. Du kan altid downloade brugsanvisningen fra vores hjemmeside og selv printe den. Hvis du gerne vil have en original brugsanvisning, anbefaler vi, at du kontakter Philips. De kan muligvis levere en original brugsanvisning. Leder du efter brugsanvisningen til din Philips HR2303 Ismaskine på et andet sprog? Vælg dit foretrukne sprog på vores hjemmeside, og søg efter modelnummeret for at se, om vi har det tilgængeligt.

Specifikationer

Mærke Philips
Model HR2303
Kategori Ismaskiner
Filtype PDF
Filstørrelse 0.58 MB

Alle brugsanvisninger til Philips Ismaskiner
Flere brugsanvisninger til Ismaskiner

Ofte stillede spørgsmål om Philips HR2303 Ismaskine

Vores support-team søger efter nyttige produktoplysninger og svar på ofte stillede spørgsmål. Hvis du finder urigtigheder i vores ofte stillede spørgsmål, må du meget gerne lade os det vide ved at bruge vores kontaktformular.

Kan jeg bruge en alternativ mælk som sojamælk i min ismaskine? Verificeret

Ja, de fleste ismaskiner er velegnet til at fremstille is med alternativ mælk.

Dette var nyttigt (266) Læs mere
Brugsanvisning Philips HR2303 Ismaskine

Relaterede produkter

Relaterede kategorier

×
Download