7
Tool / battery protection system
The tool is equipped with a tool/battery protection
system. This system automatically cuts off power to the
motor to extend tool and battery life.
The tool will automatically stop during operation if
the tool or battery is placed under one of the following
conditions. In some conditions, the indicators light up.
Overload protection
When the tool is operated in a manner that causes it to
draw an abnormally high current, the tool automatically
stops without any indication. In this situation, turn the
tool off and stop the application that caused the tool to
become overloaded. Then turn the tool on to restart.
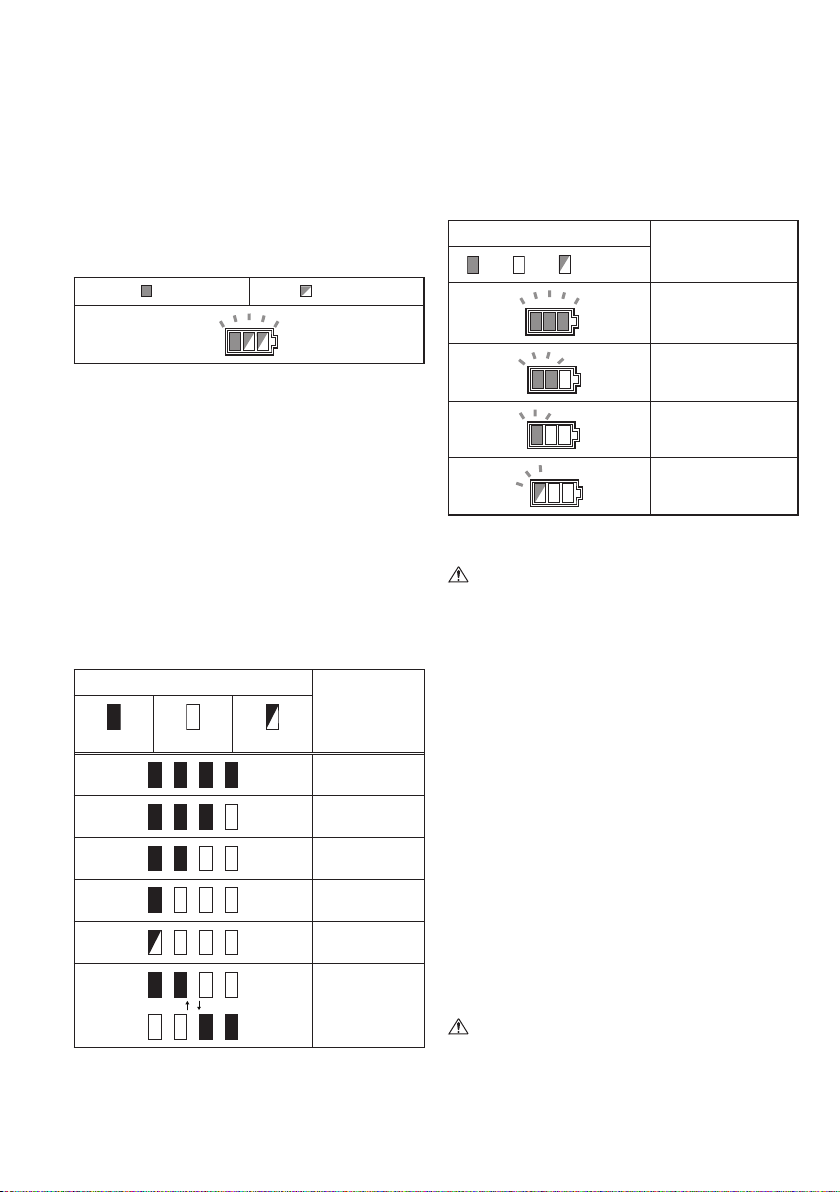
Overheat protection for tool
: On
: Blinking
015485
When the tool is overheated, the tool stops automatically,
the battery indicator blink about 60 seconds. In this
situation, let the tool cool down before turning the tool
on again.
Overdischarge protection
When the battery capacity becomes low, the tool stops
automatically. If the product does not operate even when
the switches are operated, remove the batteries from the
tool and charge the batteries.
Indicating the remaining battery capacity
(Fig. 2)
Only for battery cartridges with the indicator
Press the check button on the battery cartridge to
indicate the remaining battery capacity. The indicator
lamps light up for a few seconds.
Indicator lamps
Remaining
capacity
Lighted Off
Blinking
75% to 100%
50% to 75%
25% to 50%
0% to 25%
Charge the
battery.
The battery
may have
malfunctioned.
015658
NOTE:
• Depending on the conditions of use and the ambient
temperature, the indication may differ slightly from the
actual capacity.
Remaining battery capacity indication (Fig. 3)
(Country specic)
Press the check button to make the battery indicators
show the remaining battery capacities. The battery
indicators correspond to each battery.
Remaining battery capacity indication
Battery indicator status
Remaining battery
capacity
: On : Off : Blinking
50% – 100%
20% – 50%
0% – 20%
Charge the battery
015527
Switch action (Fig. 4 & 5)
CAUTION:
• Before inserting the battery cartridge into the tool,
always check to see that the switch trigger actuates
properly and returns to the “OFF” position when
released.
To start the tool, simply pull the switch trigger. Tool speed
is increased by increasing pressure on the switch trigger.
Release the switch trigger to stop.
For continuous operation, pull the switch trigger, push
in the lock button and then release the switch trigger.
To stop the tool from the locked position, pull the switch
trigger fully, then release it.
Speed change (Fig. 6)
The maximum air volume can be adjusted just by turning
the adjusting dial. This can be done even while the tool
is running. The dial is marked 1 (lowest) to 6 (highest).
NOTICE:
• The speed adjusting dial can be turned only as far as 6
and back to 1. Do not force it past 6 or 1, or the speed
adjusting function may no longer work.
When working in a high temperature circumstance, the
tool may be stopped because of the overheat protection
system. In that case let the tool cool down. Avoid setting
to speed 6 (highest) in high temperature circumstances.
ASSEMBLY
CAUTION:
• Always be sure that the tool is switched off and the
battery cartridge is removed before carrying out any
work on the tool.


Deltag i samtalen om dette produkt
Her kan du dele, hvad du synes om Makita DUB362PG2J Løvblæser. Hvis du har et spørgsmål, skal du først læse brugsanvisningen omhyggeligt. Anmodning om en brugsanvisning kan ske ved at bruge vores kontaktformular.