physical, sensory or mental capabilities, or
lack of experience and knowledge, unless
they have been given supervision or
instruction concerning use of the appliance by
a person responsible for their safety. Children
should be supervised to ensure that they do
not play with the appliance.
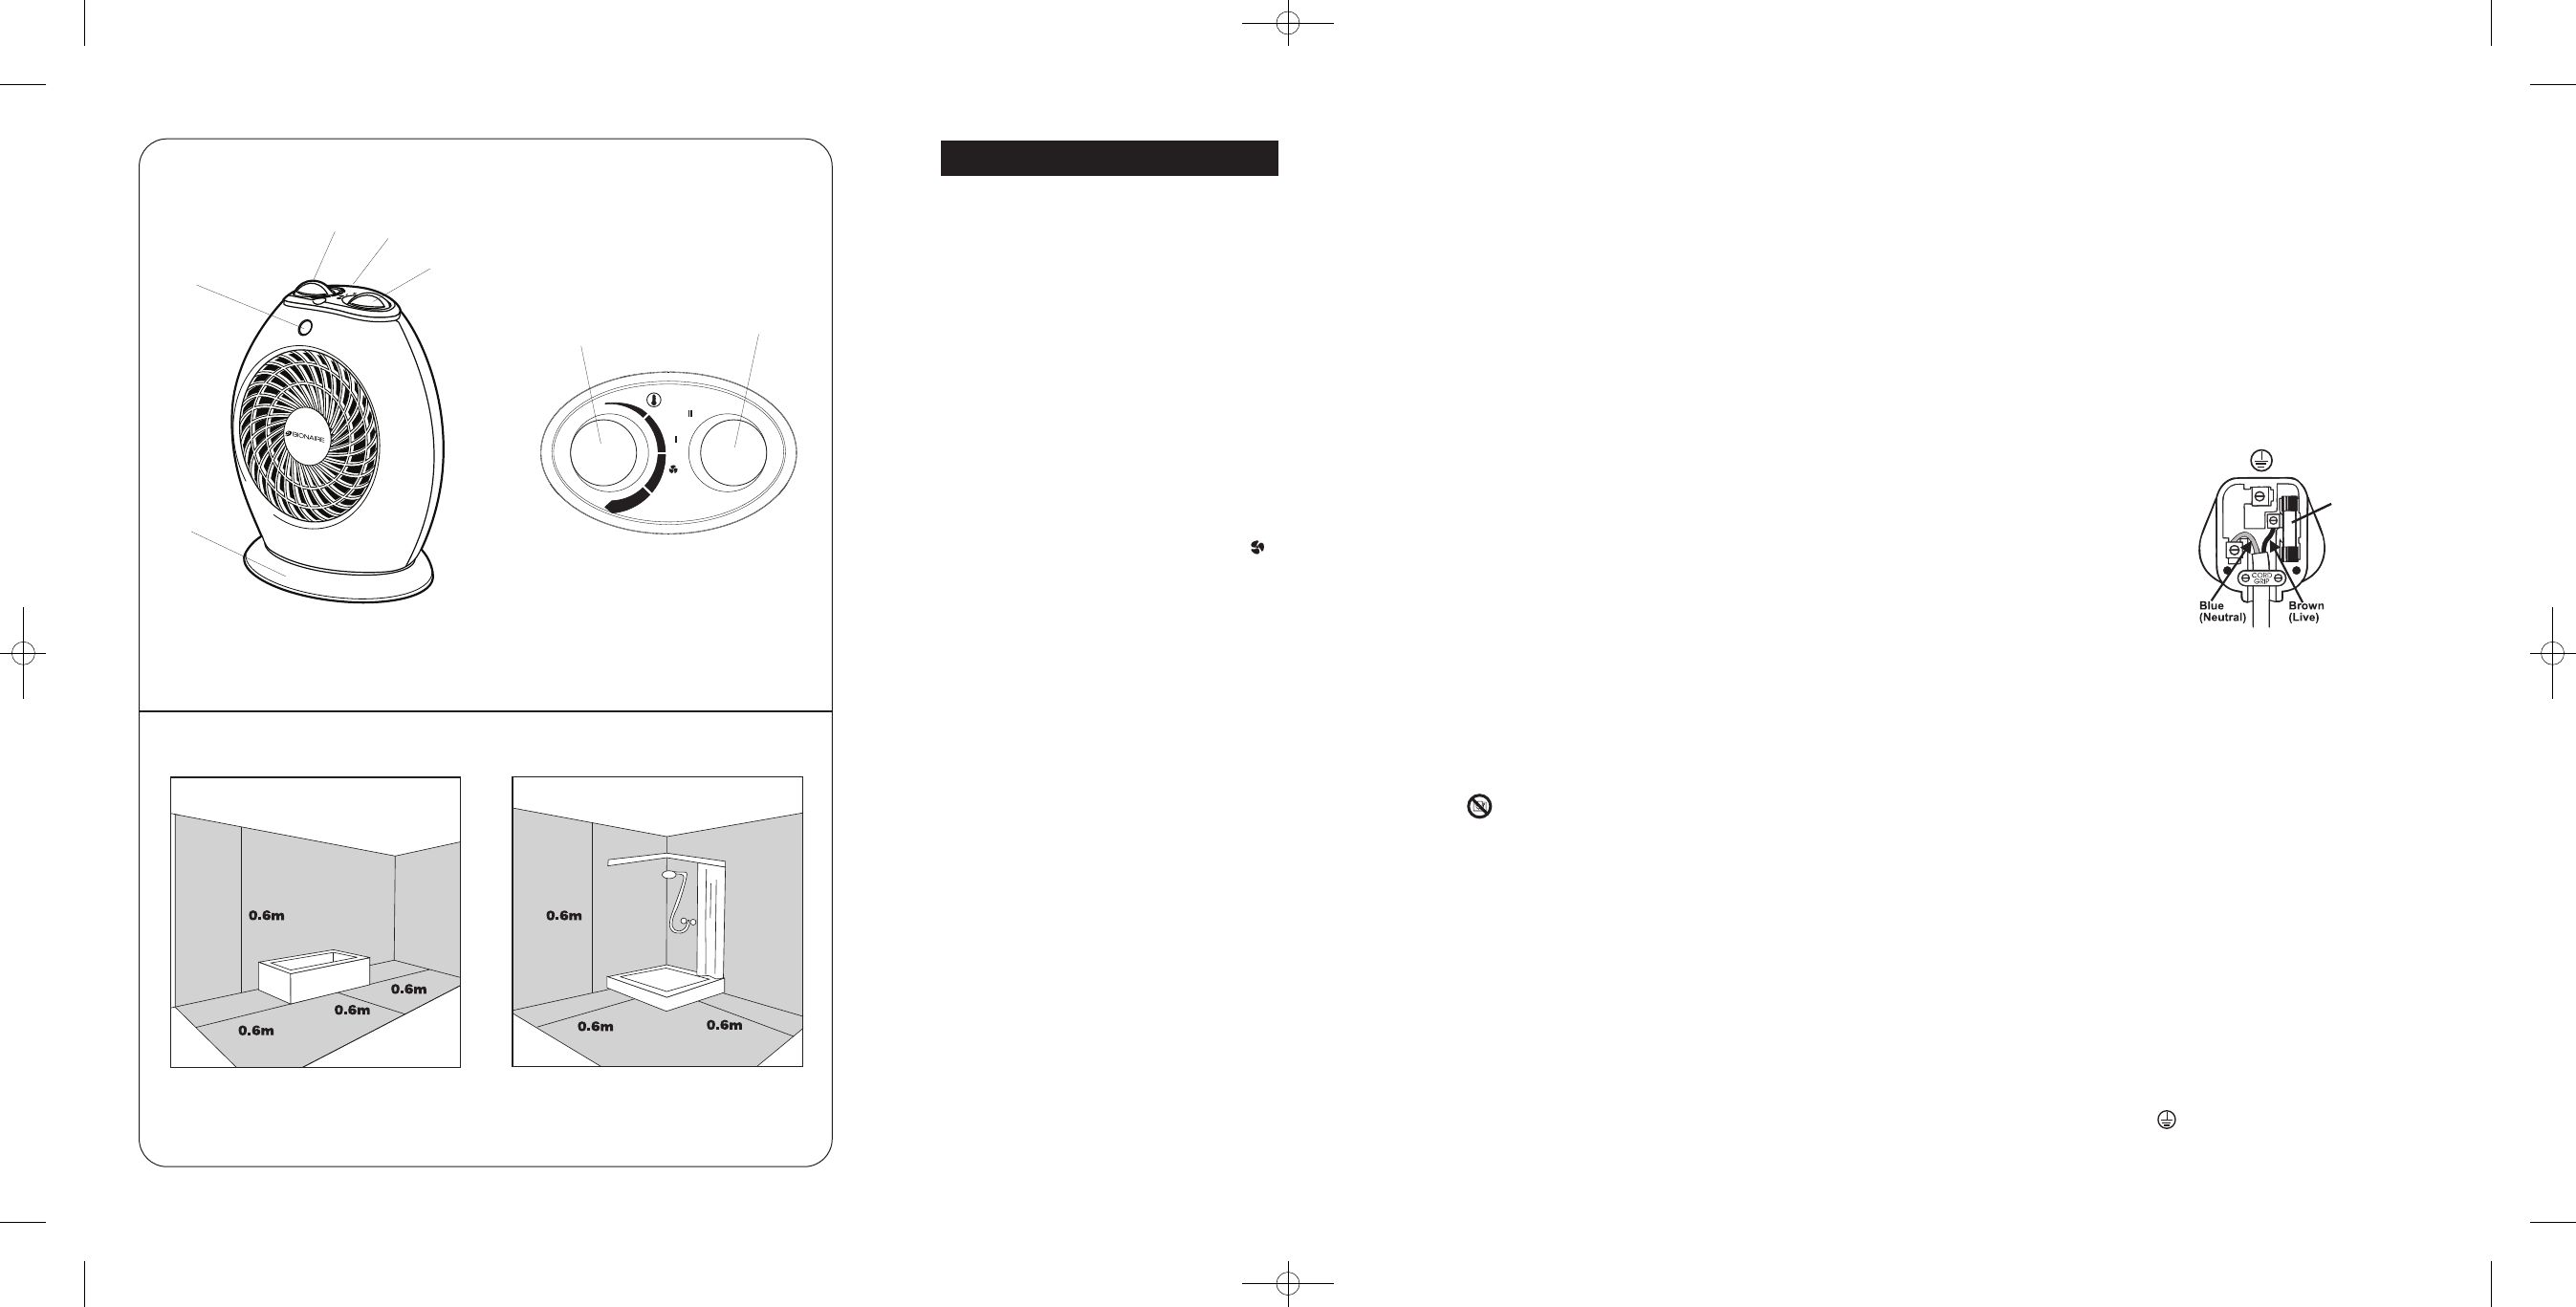
BATHROOM USE
UK ONLY:
• Regulations prevent the use of this heater in
the bathroom.
IN OTHER COUNTRIES
• If this heater is going to be used in a
bathroom, or similar room, it must be installed:
a. In such a way that the switches and other
controls cannot be touched by the person
in the bath or shower.
b. Outside the grey shaded areas (Fig 3 and 4).
• If you are unsure about the installation of this
heater in the bathroom we recommend that
you seek advice from a professional
electrician/installer.
Safety in use
• Extra caution is necessary when the heater is
used near children or when it is left unattended.
• DO NOT insert any objects into the heater.
• Keep the mains cord at a safe distance from
the main body of the heater.
• Prevent overheating of the heater by keeping
the air inlet and outlet unblocked. DO NOT
hang anything in front of or above the heater.
• If overheating should occur, the built-in
overheating safety device will switch off the
heater.
• DO NOT use aerosols, inflammable substances
or materials sensitive to heat in the flow of hot air.
• Do not place the cord under a rug.
Servicing
• Should the heater stop working, first check the
fuse in the plug (UK only) or fuse / circuit breaker
at the distribution board is operating, before
contacting the manufacturer or service agent.
• If the supply cord or plug is damaged, it must
be replaced by the manufacturer or its service
agent or a similarly qualified person in order
to avoid hazard.
• The heater contains no user serviceable parts
and should the product suffer damage or breakdown
it must be returned to the manufacturer or
their service agent.
CLEANING AND MAINTENANCE
• Turn off the unit.
• Remove the plug from the wall socket.
• Wait for the heater to cool down sufficiently.
• You may clean the outside of the heater with a
damp cloth. DO NOT allow water to come into
the appliance. DO NOT use soap or
chemicals, which may damage the housing.
Allow sufficient time to dry before plugging the
unit back in the socket.
• Clean the air inlet and outlet openings
regularly (with normal use at least twice a
year) with a vacuum cleaner.
For U.K. and Ireland only:
If the plug is not suitable for the socket outlets in
your home, it can be removed and replaced by a
plug of the correct type. Please refer to
"Installation of a plug" below.
Installation of a plug applicable to U.K.
and Ireland only
NOTE: If the terminals in the plug are not
marked or if you are unsure or in doubt about
the installation of the plug please contact a
qualified electrician. If a 13A 3-pin plug is fitted,
it must be an ASTA approved plug, conforming
to BS1363 standard. Replacement 13A fuses
must be BSI or ASTA BS1362 approved.
This product is fitted with a 13A plug complying to
BS1363. If this plug is unsuitable or needs to be
replaced, please note the following: The wires in
the mains lead are coloured as such:
BROWN - LIVE
BLUE - NEUTRAL
Please note that the colour of these mains wires
may not correspond with the colour markings that
identify the terminals in your plug. Please proceed
as follows:
The BROWN coloured wire must be connected to
the terminal, which is marked with the letter "L" or
is coloured RED.
The BLUE coloured wire must be connected to
the terminal, which is marked with the letter "N" or
is coloured BLACK.
DO NOT CONNECT either of these wires to the
earth terminal in the plug. The earth terminal plug
is marked with the letter "E", or with the earth
symbol , or coloured GREEN, or GREEN and
YELLOW.
3
READ AND RETAIN THE FOLLOWING
FOR FUTURE REFERENCE.
GENERAL DESCRIPTION (Fig.1)
A.POWER LIGHT
B.MODE CONTROL
C.THERMOSTAT
D. CARRY HANDLE (not visible)
E.BASE
OPERATING INSTRUCTIONS (Fig.2)
1. For heater operation, please set the
Thermostat (C) all the way to the maximum
temperature, then see section SETTING THE
THERMOSTAT for further instructions.
2. Turn the Mode Control (B) to desired heat setting:
I - Low setting
II - High setting
3. For fan-only operation, without any heat
output, turn the Mode Control to the FAN ( )
setting. NOTE: The Thermostat (C) must be
turned to the maximum setting to being
operating the fan setting.
4. The Power Light (A) will remain lit during
operation.
SETTING THE THERMOSTAT (Fig.2)
1. You need to set Thermostat (C) on the
maximum temperature and the Mode Control
(B) to a heat setting to start the heater. Allow
heater to operate and warm up the room.
2. When the desired temperature / comfort level
is reached, lower the thermostat setting until
the fan/heater stops operating.
3. The control will now automatically maintain
the pre-set temperature level by turning the
heater ON and OFF.
NOTE: It is normal for the heater to cycle ON
and OFF as it maintains the preset temperature.
To prevent the unit from cycling, you need to
raise the thermostat setting.
AUTO SAFETY SHUT OFF
The heater has a built in safety device which will
switch off the heater automatically in case of
accidental overheating. It can only resume
operation when the user has reset the unit.
To reset the heater (Fig.2)
1. Turn the Mode Control to the OFF ( O ) position.
2. Unplug the heater and wait for 30 minutes for
the unit to cool down.
3. After the 30 minutes, plug the unit in again
and operate normally.
Safety Back-Up Fuse
In the unlikely case the heater does not respond
to an overheat situation, the safety back-up fuse
will engage. In this case, the heater will not
reset. Please contact your local service number
for advice.
IMPORTANT SAFEGUARDS
Mains connection
• Read these instructions carefully, in conjunction
with the illustrations, before using the heater.
• Before connecting the heater, check that the
voltage indicated on the rating plate corresponds
to the mains voltage in your home / office.
• Avoid the use of an extension cord because it
may cause the heater to overheat.
• WARNING: Risk of Fire. Discontinue use if
the outlet or plug become hot to the touch.
Overheating may indicate a worn or damaged
outlet. Consult a qualified electrician for outlet
replacement.
Safe positioning
• Only touch the heater with dry hands.
• DO NOT position where it can be touched by
children, especially the very young.
• When using the heater, DO NOT place in the
immediate surroundings of a shower or
swimming pool.
• DO NOT use this heater outdoors.
• DO NOT position the heater directly under a
power socket.
• Position the heater in such a manner that the
air flow toward the heater and away from it, is
not obstructed.
• WARNING: In order to avoid overheating, do
not cover the heater ( ).
• Allow a safe area around the heater. DO NOT
block the air inlet or outlet. Keep objects at
least 50 cm from the top and sides and 200
cm at the front.
• Do not use this heater when it is lying on its side.
• If the heater is tipped over, unplug it and allow
it to cool before standing it back up.
• DO NOT use the heater in rooms with
explosive gas (e.g. petrol) or while using
inflammable glue or solvent (e.g. when gluing
or varnishing parquet floors, PVC etc.)
CAUTION: In order to avoid a hazard due to
inadvertent resetting of the thermal cutout, this
appliance must not be supplied through an
external switching device, such as a timer, or
connected to a circuit that is regularly switched
on and off by the utility.
• This appliance is not intended for use by
persons (including children) with reduced
ENGLISH
2
A
B
C
D
E
Fig.1
Fig.3
Fig.4


Deltag i samtalen om dette produkt
Her kan du dele, hvad du synes om Bionaire BFH251 Varmeblæser. Hvis du har et spørgsmål, skal du først læse brugsanvisningen omhyggeligt. Anmodning om en brugsanvisning kan ske ved at bruge vores kontaktformular.