
GB/IE/NI GB/IE/NI GB/IE/NI GB/IE/NI
GB/IE/NI GB/IE/NI GB/IE/NI DKDKDK
Sikkerhedshenvisninger til
akkumulator-batterierne
ADVARSEL! EKSPLOSIONSFARE! Hold batterierne på afstand af børn, kast
ikke batterierne ind i ild, kortslut dem ikke og skil dem ikke ad.
Ved manglende overholdelse af henvisningerne, kan batterierne aflades ud over deres
slutspænding. Dette kan resultere i udsivning fra batteriet.
Undgå kontakt med hud, øjne og slimhinder, såfremt væske er sivet ud af batterierne. Skyl
de pågældende steder med det samme med rigeligt klart vand og opsøg omgående en læge.
Henvisning: Lyser den røde batteri-kontrollampe
5
,
13
i forlygten
6
eller i baglygten
14
,
skal batterierne oplades.
Vær opmærksom på, at når batterivisningen lyser, svarer lygterne ikke mere til StVZO.
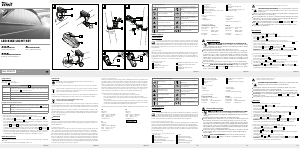
Montage
Montering af forlygte (se afbildning A)
Drej fastspændingsskruen
3
ud af holderen
1
.
Positionér holderen
1
på det ønskede sted på styret. Anvend i giver fald reduktionsgummierne
2
, for
at opnå en optimal pasform.
Drej fastspændingsskruen
3
fast.
Spænd derved skruen håndfast. Anvend ikke noget værktøj for at undgå beskadigelser.
For at indstille den optimale vinkel til kørselsretningen, skal vinkeljusteringsskruen
7
løsnes 2–3
omdrejninger med en stjerneskruetrækker.
Indstil den ønskede vinkel og spænd vinkeljusteringsskruen
7
fast igen.
Skub forlygten
6
på holderen
1
indtil du hører, at den går i hak.
For at løsne, tryk på fastgørelsesanordningen til forlygten
8
og skub forlygten
6
fremad fra holderen
1
.
ADVARSEL! Kontrollér jævnligt den korrekte indstilling af din forlygte. Lyskeglen skal vise ligeud i
kørselsretningen og må ikke være indstillet for højt, for ikke at blænde modkørende trafikanter.
Montering af baglygte (se afbildning B + C)
Fastgør holderen
9
ved hjælp af gummilasken
11
på saddelstøtten eller bagdelsafstivningen. Vær
opmærksom på, at der ikke befinder sig genstande foran baglygten
14
.
Træk gummilasken
11
stram og hægt denne i.
Løsn holderens
9
fastspændingsskrue
15
og indstil den ønskede vinkel.
Spænd efterfølgende skruen fast igen. Spænd derved skruen håndfast. Anvend ikke noget værktøj for
at undgå beskadigelser.
Skub baglygten
14
på holderen
9
indtil du hører, at den går i hak.
For at slukke baglygten
14
tryk på fastgørelsesanordningen til baglygten
10
og træk baglygten
14
af.
ADVARSEL! Baglygten skal være monteret og indstillet på en sådan måde, at referenceaksen befinder
sig parallelt med køretøjets midterplan og parallelt til kørebanen.
12
Tænd- / sluk-kontakt baglygte
13 a
Kontrolsystem til baglygte-batteri
13 b
Tag-modus visning
14
Baglygte
15
Fastspændingsskrue baglygteholder
16
USB-kabel
17
Batteri-ladebøsning (for-og baglygte)
Leverede dele
1 forlygte
1 baglygte
1 holder forlygte
1 holder baglygte
Reduktionsgummier
1 USB-kabel
1 montage- og betjeningsvejledning
Tekniske data
Forlygte (blændfrit)
Type-betegnelse: LI-2A / XC-195S
Nominel effekt: 1W
Beskyttelsesart: IP44 iht. DIN EN 60529
Li-Ion-batteri: 1300 mAh, 3,7 V
Baglygte
Type-betegnelse: LR-1B / XC-242P
Nominel effekt: 0,2W
Beskyttelsesart: IP44 iht. DIN EN 60529
Li-Ion-batteri: 300 mAh, 3,7 V
Sikkerhedshenvisninger
LIVS- OG ULYKKESFARE FOR SMÅBØRN OG BØRN!
Lad aldrig børn være uden opsyn med emballagen, da der kan være fare for
kvælning i forbindelse med slugning af emballagematerialet. Børn undervurderer
ofte farerne.
Hold altid produktet udenfor børns rækkevidde. Produktet er ikke legetøj!
Dette produkt kan benyttes af børn fra 8 år og op, samt af personer med forringede fysiske,
følelsesmæssige eller mentale evner eller mangel på erfaring og viden, når de er under
opsyn eller er blevet vejledt med hensyn til produktet og forstår de deraf resulterende farer.
Børn må ikke lege med produktet. Rengøring og brugervedligeholdelse må ikke gennemføres
af børn uden at de er under opsyn. Vær opmærksom på, at beskadigelser gennem uhensigts-
mæssig håndtering, ikke-overholdelse af betjeningsvejledningen eller indgreb gennem ikke
autoriserede personer er udelukket af garantiydelsen.
Produktet må under ingen omstændigheder skilles ad. Reparationer der udføres forkert, kan
resultere i alvorlige farer for brugeren. Reparationer må kun udføres af fagfolk. LED‘erne
kan ikke udskiftes.
LIVS- OG ULYKKESFARE! Ved anvendelse af et forkert oplader, kan
forlygten
6
og baglygten
14
beskadiges, overophedes og endda eksplodere. I dette
tilfælde ophører garantiydelsen.
De anvendte piktogrammers legende
Læs anvisningerne!
Miljøskader ved forkert bortskaffelse
af batterierne!
Livs- og ulykkesfare for småbørn
og børn!
USB – Universal Serial Bus – forbindelse-
spunkt til tilslutningen med en computer
(kun til opladning).
Overhold advarsels- og
sikkerhedshenvisninger!
K XXXXX
Tysk godkendelsesmærke af Kraftfahrt-
Bundesamt (K med efterfølgende
registreringsnummer).
Advarsel! Eksplosionsfare!
Produkter og emballage skal bortskaffes
miljøvenligt.
Grüner Punkt-mærket - recycling
af emballage.
21
PAP
Recycling-kode til bortskaffelse af pap.
Symbol til genkendelse af elektriske
og elektroniske apparater.
Produktet svarer til de gældende
europæiske retningslinjer for dette prod
ukt
LED-cykellygtesæt
Indledning
Hjerteligt tillykke med købet af dit nye produkt. Med købet har du besluttet dig for et førsteklasses
produkt. Betjeningsvejledningen hører med til dette produkt. Den indeholder vigtige henvisninger
i forbindelse med sikkerhed, montage og bortskaffelse. Gør dig fortrolig med alle betjenings- og
sikkerhedshenvisninger inden første ibrugtagning af produktet. Brug kun produktet som beskrevet og kun til
de dertil oplyste formål. Udlevér alle dokumenter, når produktet gives videre til tredjemand.
Formålsbestemt anvendelse
Produktet er egnet til kørebanebelysning i forbindelse med cykling. LED-cykellygte-sættet er godkendt til alle
cykler som eneste belysning. Lysfordelingen må ikke forhindres gennem andre cykel- eller baggagedele.
Produktet er beregnet til udendørs brug. En anden anvendelse end før beskrevet eller en ændring af produktet
er ikke tilladt og kan føre til skader og beskadigelser af produktet. For skader, som er opstået i forbindelse
med uhensigtsmæssig anvendelse overtager producenten ikke nogen hæftelse. Produktet er ikke bestemt til
den erhvervsmæssige brug.
Beskrivelse af de enkelte dele
1
Holder forlygte
2
Reduktionsgummier
3
Fastspændingsskrue forlygteholder
4
Tænd- / sluk-kontakt forlygte
5
Kontrolsystem til forlygte-batteri med integreret
auto-modus-visning
6
Forlygte
7
Vinkeljusteringsskrue forlygte
8
Fastgørelsesanordning til forlygte
9
Holder baglygte
10
Fastgørelsesanordning til baglygte
11
Gummilaske holder baglygte
Extent of warranty
The device was manufactured to strict quality guidelines and diligently inspected prior to shipment. The war-
ranty applies to defects in material or manufacture. This warranty does not apply to product parts subject to
regular wear and therefore considered wear parts or damage to fragile parts, e.g. switches, rechargeable
batteries, or made from glass. This warranty becomes void if the device has been damaged or improperly
used or maintained. Proper use of the product requires strictly observing all instructions for use. Purposes
and practices which the operating instructions warn of or advise against must be avoided without fail. This
product is only intended for private, non-commercial use. Any incorrect or improper use of the device, use
of force and changes not performed by our authorized service branch will void the warranty.
Please follow the instructions below to ensure your claim is processed quickly:
· Please have your receipt and the product number ready as your proof of purchase.
· Please refer to the type plate or the cover sheet of these instructions for the product number.
· In the event of malfunctions or other defects, please first contact the following service department by
phone or e-mail.
· A product determined defective may then be returned to the specified service address free of charge,
including the proof of purchase (receipt) and information about the defect and when it occurred. Please
note, the service department must be notified before returning the product!
This and many other manuals, product videos and software are available for download at www.lidl-service.com.
GB
KLB GmbH
Diekbree 8
DE-48157 Münster, GERMANY
Phone: +49 2 51 132 37 57
www.klb-service.eu
IE
KLB GmbH
Diekbree 8
DE-48157 Münster, GERMANY
Phone: +49 2 51 132 37 57
www.klb-service.eu
NI
KLB GmbH
Diekbree 8
DE-48157 Münster, GERMANY
Phone: +49 2 51 132 37 57
www.klb-service.eu
IAN 294079
Disposal
The packaging is made of environmentally friendly materials, which may be disposed
of through your local recycling facilities.
Contact your local refuse disposal authority for more details on how to dispose of your worn-out product.
To help protect the environment, please dispose of the product properly, not without household
waste, when it has reached the end of its useful life. Please contact your local authority for infor
-
mation on collection points and their opening hours.
Defective or old rechargeable batteries must be recycled in accordance with Directive 2006/66/EC and
its amendments. Return rechargeable batteries and / or the device to the recycling facilities provided.
Improper disposal of rechargeable batteries may
result in environmental damage!
Rechargeable batteries may not be disposed with household waste. They may contain toxic heavy metals and
are subject to hazardous waste regulations. The chemical symbols of the heavy metals are: Cd = cadmium,
Hg = mercury, Pb = lead. For this reason, dispose of used rechargeable batteries at a local collection point.
Improper rechargeable battery disposal destroys valuable resources and the hazardous substances in the
rechargeable batteries may pose a significant danger to human health and environment. Separate collection /
disposal of old rechargeable batteries prevents dangers to human health and environment, and valuable
resources regained by recycling.
Warranty
Dear customer,
This device is covered by a 3-year warranty from the date of purchase. In the event of product defects, you
have legal rights against the retailer of this product. Your statutory rights are not limited in any way by our
warranty detailed below.
Warranty terms
The warranty period begins on the date of purchase. Please retain the original receipt safely. This documen-
tation is required as the proof of purchase. Should a defect in material or manufacture occur within three
years from the date of purchase of this product, we will repair or replace - at our choice - it free of charge.
This warranty is conditional on the defective device and the receipt of purchase being presented within the
three year warranty period, and that there is a brief written description of the nature of the defect and of the
date it arose. If the defect is covered by our warranty, you will receive the repaired product or a replacement.
A repair or exchange of the device does not extend a new warranty period. The warranty period will not be
extended by repairs made under warranty. This also applies to replaced and repaired parts. Any damage
or defects present at the time of purchase must be reported immediately after unpacking. Repairs made after
the expiration of the warranty period are subject to payment.
Operation
Switching on / off
The headlight
6
has three brightnesses.
On / Off switch
4
press once Automatic mode:
The light intensity adapts automatically to ambient lighting conditions. When automatic
mode is switched on
5
the switch flashes green.
press twice Power mode (50 Lux) for riding in unlit areas
press three times Standard mode (25 Lux) for riding in lit areas
press four times Eco mode (10 Lux) for riding in well lit areas
press five times power off
Tail light with brake indicator function
press once Day-mode:
Tail light is off. Brake indicator function is active. Day-mode display
13 b
flashes green.
press twice Night-mode:
Tail light is on. Brake indicator function is active.
press three times power off
Charging the headlight / tail light (see Fig. D + E)
Remove the rubber cover from the battery charging socket
17
and connect the USB cable
16
to the
battery charging socket
17
.
Then connect the USB plug of the USB cable
16
to a computer / laptop / standard USB charger with
5 V DC and 500–1000 mA. Using chargers with different specifications can damage the rechargeable
battery, thus the headlight. Doing so will void the warranty.
The headlight
6
and tail light
14
feature a battery indicator. If the indicator lights up red, the rechargea
ble
batteries are drained. The indicator will light up green whilst charging. When the rechargeable batteries
are ready to be used again, the indicator will go out and you can use the headlight
6
and tail light
14
.
For the built-in rechargeable battery to operate at full power, please do not charge the headlight rec
harge-
able battery for less than 6 hours the first time (tail light: no less than 5 hours). Please do not stop charg-
ing sooner, even if the LED is already extinguished. After this, a charging time of approx. 3.5 hours is
recommended for the headlight (recommended charging time for the tail light is 2.5 hours).
Cleaning and care
Never fully immerse the lights. Do not use corrosive or abrasive cleaning agents. Doing so will damage
the lights.
Clean the LED bicycle light set with a slightly damp, lint-free cloth.
List of pictograms used
Read the instructions!
Improper disposal of rechargeable
batteries may result in environmental
damage!
Danger to life and risk of accident
for infants and children!
USB – Universal Serial Bus – Connection
port, e.g. on a computer (charging only).
Observe the warnings and safety
notices!
K XXXXX
German Federal Motor Transport
Authority test symbol (K followed by
approval number).
Caution! Explosion hazard!
Product and packaging should be
disposed in an environmentally friendly
manner.
Green Dot - Packaging recycling.
21
PAP
Recycling code for cardboard disposal.
Symbol identifying electrical and
electronic devices.
Product meets the applicable European
product-specific directives
LED Bike light set
Introduction
Congratulations on the purchase of your new device. In doing so you have chosen a top-quality
product. The instructions for use are to be considered as part of this product. It contains important
safety, assembly and disposal information. Before using the product, please familiarise yourself
with all the safety information and instructions for use. The product must only be used as described and for
the specified fields of application. If you pass the product on to anyone else, please be sure to also include
all documentation.
Intended use
This product is suitable for lighting the roadway whilst cycling. The LED Bicycle Light Set is approved as ex-
clusive lighting for all bicycles. Light distribution must not be impaired by other bicycle parts or luggage. The
product is intended for outdoor use. Any use other than the aforementioned or any product modification is
prohibited and can result in injuries and product damage. The manufacturer is not liable for damages result
-
ing from improper use. This product is not intended for commercial use.
Parts description
1
Headlight bracket
2
Reducer rubber
3
Headlight bracket retaining screw
4
Headlight on / off switch
5
Headlight rechargeable battery control system
with integrated automatic mode indicator
6
Headlight
7
Headlight angle adjustment screw
8
Headlight lock
Safety instructions for rechargeable batteries
CAUTION! EXPLOSION HAZARD! Keep rechargeable batteries away from
children, do not throw rechargeable batteries into fire, do not short-circuit and do
not take apart.
Failure to observe this instruction may result in the rechargeable batteries discharging beyond
their end voltage. This poses a risk of leaking.
Avoid contact with the skin, eyes and mucous membranes if fluid has leaked from the recharge-
able batteries. In the event of contact with battery acid, thoroughly flush the affected area
with clean water and seek immediate medical attention.
Note: If the red rechargeable battery control light
5
,
13
on the headlight
6
or the tail
light
14
lights up, please recharge the rechargeable batteries immediately.
Please note, once the rechargeable battery control system lights up, the lights no longer
comply with the Road Traffic Act.
Installation
Installing the headlight (see Fig. A)
Unscrew the retaining screw
3
from the bracket
1
.
Position the bracket
1
in the desired location on the handlebar. If necessary, use the reducer
rubbers
2
to ensure an optimal fit.
Reinstall the retaining screw
3
.
Tighten the screw hand tight. To prevent damage, do not use tools for this step.
To adjust to the optimal angle to the direction of travel, loosen the angle adjustment screw
7
2–3 turns
using a cross-tip screwdriver.
Adjust to the desired angle and tighten the angle adjustment screw
7
.
Slide the headlight
6
into the bracket
1
until you hear it lock into place.
To release, press the headlight lock
8
and slide the headlight
6
forward out of the bracket
1
.
ATTENTION! Routinely verify the headlamp adjustment. The light cone must point straight ahead, in
the direction of travel, and must not be adjusted too high so as not to blind oncoming traffic.
Installing the tail light (see Fig. B + C)
Secure the bracket
9
to the seat post or the rear cross-bar using the rubber tab
11
. Be sure there are
no objects in front of the tail light
14
.
Tighten and hook in the rubber tab
11
.
Loosen the retaining screw
15
on the bracket
9
and adjust to desired angle.
Then tighten the screw. Tighten the screw hand tight. To prevent damage, do not use tools for this step.
Slide the tail light
14
into the bracket
9
until you hear it lock into place.
To remove the tail light
14
press the tail light locking mechanism
10
and take off the tail light
14
.
ATTENTION! The tail lamp must be installed and adjusted so the reference axis is parallel to the median
longitudinal plane of the vehicle and parallel to the road.
9
Tail light bracket
10
Tail light lock
11
Tail light bracket rubber tab
12
Tail light on / off switch
13 a
Tail light rechargeable battery control system
13 b
Day-mode display
14
Tail light
15
Retaining screw tail light holder
16
USB cable
17
Rechargeable battery charging socket
(front and rear lights)
Scope of delivery
1 Headlight
1 Tail light
1 Headlight bracket
1 Tail light bracket
Reducer rubbers
1 USB cable
1 Instructions for assembly and use
Technical data
Headlight (auto-dimming)
Model designation: LI-2A / XC-195S
Rated output: 1 W
Protection type: IP44 according to
DIN EN 60529
Rechargeable
Li-ion battery: 1300 mAh, 3.7 V
Tail light
Model designation: LR-1B / XC-242P
Rated output: 0.2 W
Protection type: IP44 according to
DIN EN 60529
Rechargeable
Li-ion battery: 300 mAh, 3.7 V
Safety instructions
DANGER TO LIFE AND RISK OF ACCIDENT FOR IN-
FANTS AND CHILDREN! Never leave children unsupervised with the packing
material due to the suffocation hazard posed by swallowing parts thereof. Children
frequently underestimate the dangers.
Always keep the product away from children. This product is not a toy!
This product may be used by children 8 years and up as well as by persons with physical,
sensory or mental impairments or lacking experience and knowledge, when supervised or
instructed in the safe use of the product and understand the associated risks. Do not allow
children to play with the product. Cleaning and user maintenance must not be performed by
children without supervision. Please note, damages caused by incorrect handling, non-com-
pliance with the operating instructions or interference with the device by unauthorised indi-
viduals are excluded.
Never take the product apart. Improper repairs can put the user in considerable danger.
Repairs should only be carried out by specialist personnel. The LED lights are not replaceable.
RISK OF LOSS OF LIFE AND ACCIDENT! Using the incorrect charger
may cause the headlight
6
and the tail light
14
to be damaged, overheat or even explode.
Doing so will void the warranty.
IAN 294079
LED BIKE LIGHT SET
Item No. 14141
LED-FAHRRADLEUCHTEN-SET
Bedienungs- und Sicherheitshinweise
LED BIKE LIGHT SET
Operation and Safety Notes
LED-CYKELL Y GTESÆT
Brugs- og sikkerhedsanvisninger
A
2
1
6
4 5
8
7
3
E
C
D
17
16
lock
B
14
15
12
13 a 13 b
11
9
10
17
16

Deltag i samtalen om dette produkt
Her kan du dele, hvad du synes om Crivit IAN 294079 Cykellygte. Hvis du har et spørgsmål, skal du først læse brugsanvisningen omhyggeligt. Anmodning om en brugsanvisning kan ske ved at bruge vores kontaktformular.